Panduan Instalasi Saklar Kartu Kunci Hotel: Wiring Kamar
Panduan instalasi saklar kartu kunci hotel untuk teknisi dan tim perawatan: persiapan kotak, pengkabelan, relai, uji kartu, delay-off, dan commissioning.
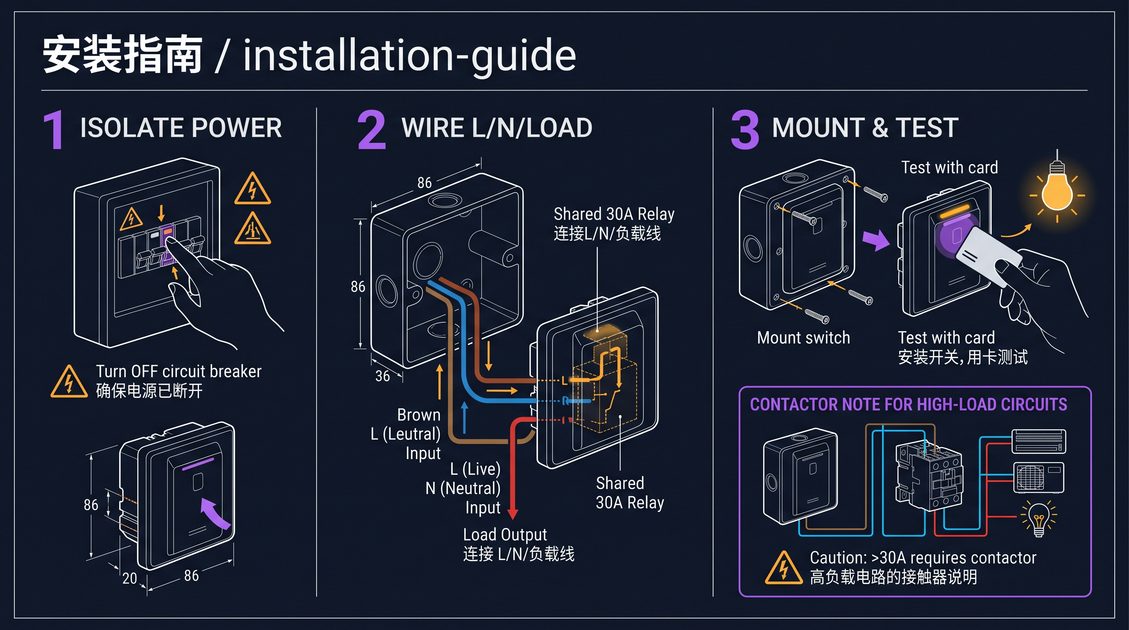
Panduan instalasi saklar kartu kunci hotel adalah metode langkah demi langkah untuk memasang saklar daya yang dikendalikan kartu ke dalam kamar tamu, mencakup persiapan kotak, isolasi listrik, pengkabelan line dan load ke relai, pemasangan panel flush, pengujian penyisipan kartu, dan verifikasi timer delay-off. Panduan instalasi saklar kartu kunci hotel ditulis untuk elektrisi, staf perawatan, dan integrator sistem yang meretrofit kamar tanpa pengkabelan ulang besar, dan memperlakukan isolasi keselamatan di titik distribusi sebagai langkah pertama. Panduan instalasi saklar kartu kunci hotel memandu pemasang melalui urutan: memastikan kotak sesuai dengan panel, menyambungkan suplai kamar ke kontak relai, menyalurkan pasangan kontrol berarus kecil ke pelat, mengamankan panel, dan memastikan relai menutup serta delay-off berfungsi sebelum sirkuit diaktifkan. Panduan instalasi saklar kartu kunci hotel menegaskan bahwa pekerjaan ini adalah penggantian panel ditambah sambungan relai, bukan pengkabelan ulang kamar.
Persiapan Kamar untuk Panduan Instalasi Saklar Kartu Kunci Hotel
Fase persiapan dalam panduan instalasi saklar kartu kunci hotel dimulai dengan memastikan kotak dinding dan kecocokan panel. Unit yang paling umum adalah panel flush berukuran sekitar 86mm kali 86mm, dengan bodi belakang sedalam sekitar 48mm, yang mana sekitar 29mm berada di dalam dinding saat terpasang. Sebelum memotong apa pun, pemasang harus mengukur kotak single-gang yang ada — kedalamannya, telinga sekrupnya, dan jejak kakinya — lalu membandingkannya dengan dimensi bodi belakang saklar. Panduan instalasi saklar kartu kunci hotel memperlakukan kecocokan kotak sebagai verifikasi pra-pemasangan karena panel yang tidak duduk rata dalam kotak yang dangkal tidak akan terpasang dengan rapi, dan memotong kotak yang lebih dalam pada plester yang sudah jadi jauh lebih mengganggu daripada pengkabelannya sendiri. Jika kotak terlalu dangkal atau rusak, pemasang harus memasang box extender atau memilih varian surface-mount sebelum melanjutkan.
Langkah persiapan kedua dalam panduan instalasi saklar kartu kunci hotel adalah mengumpulkan alat dan bahan. Pemasang membutuhkan voltage tester atau multimeter, obeng yang sesuai untuk sekrup terminal dan sekrup pemasangan, obeng pipih kecil untuk terminal, wire stripper, pemotong kabel, dan perangkat keras pemasangan panel. Bahan-bahannya mencakup konduktor berukuran tepat untuk kontak relai, pasangan kontrol ke panel, cable gland atau grommet tempat kabel masuk ke kotak, dan pelat adaptor yang diperlukan untuk kotak. Panduan instalasi saklar kartu kunci hotel menyarankan menata semuanya sebelum memulai agar pemasang tidak terganggu di tengah penyambungan, dan memperingatkan bahwa setiap sambungan harus dibuat dengan sirkuit dalam keadaan terisolasi.
Langkah persiapan ketiga adalah mengidentifikasi sirkuit kamar dan jalur beban. Pemasang harus mengetahui breaker atau sekring mana di titik distribusi yang menyuplai kamar ini, dan harus menelusuri bagaimana suplai listrik mencapai posisi saklar serta bagaimana beban berlanjut ke lampu, stopkontak, dan termostat pendingin udara. Panduan instalasi saklar kartu kunci hotel meminta pemasang memetakan pengkabelan yang ada pada sketsa atau foto sebelum menyentuh apa pun, karena suplai kamar harus disalurkan melalui kontak relai sementara hanya pasangan kontrol yang menuju panel. Salah memahami kabel mana yang merupakan suplai masuk dan mana yang merupakan beban keluar adalah penyebab paling umum dari instalasi yang menghidupkan panel tetapi tidak mengendalikan daya kamar.
Langkah persiapan keempat adalah memastikan tegangan suplai dan polaritas. Pemasang harus memverifikasi bahwa tegangan terukur di kotak sesuai dengan input rated saklar, biasanya 110V atau 180–250V AC, sebelum penyambungan. Panduan instalasi saklar kartu kunci hotel menuntut pemeriksaan tegangan hidup dengan meteran daripada memercayai label, karena suplai yang salah identifikasi atau tegangan liar dapat merusak panel atau menimbulkan bahaya sengatan listrik. Polaritas konduktor live harus dikonfirmasi jika terminal unit diberi tanda, karena menyambungkan line ke terminal yang salah adalah penyebab seringnya panel berdengung, gagal mensakelar, atau akhirnya rusak.
Langkah persiapan kelima adalah memutuskan apakah akan menggunakan relai bawaan atau relai eksternal. Jika saklar memiliki relai bawaan, pemasang menyalurkan suplai kamar langsung ke terminal beban panel. Jika model membutuhkan relai eksternal atau kontaktor karena beban kamar melebihi rating internal, pemasang harus menentukan titik pemasangan untuk relai tersebut, dekat panel atau di papan distribusi, dan menarik pasangan kontrol di antara keduanya. Panduan instalasi saklar kartu kunci hotel memperlakukan keputusan ini sebagai bagian dari persiapan agar relai yang tepat, kabel yang tepat, dan posisi pemasangan yang tepat siap sebelum daya diisolasi.
Isolasi Keselamatan dalam Panduan Instalasi Saklar Kartu Kunci Hotel
Keselamatan adalah perintah pertama dalam setiap panduan instalasi saklar kartu kunci hotel, dan dimulai dengan mengisolasi sirkuit kamar di titik distribusi. Sebelum penutup mana pun dibuka, pemasang harus mematikan circuit breaker atau mencabut sekring yang menyuplai kamar serta mengunci atau memberi label titik isolasi agar tidak ada yang mengaktifkannya kembali selama pekerjaan. Panduan instalasi saklar kartu kunci hotel memperlakukan lockout-tagout sebagai hal yang tidak bisa ditawar, karena asisten atau elektrisi yang kembali dan membalik breaker yang salah saat tangan berada di dalam kotak dapat menyebabkan cedera serius. Isolasi harus dikonfirmasi dengan voltage tester pada konduktor di posisi saklar, bukan diasumsikan dari posisi breaker.
Langkah keselamatan kedua dalam panduan instalasi saklar kartu kunci hotel adalah memverifikasi tegangan nol pada terminal persis yang akan dikerjakan. Tegangan bisa hadir meskipun breaker mati jika suplai dibagi, jika sirkuit lain melewati kotak, atau jika ada kapasitansi liar di kabel. Pemasang harus menguji antara live dan netral, antara live dan earth, serta antara live dan live di kotak dan tidak menemukan tegangan sebelum menyambung. Panduan instalasi saklar kartu kunci hotel menyarankan pengujian di terminal, bukan hanya di titik jauh, karena netral bersama atau suplai yang salah sambung di tempat lain dapat membuat kotak tetap bertegangan.
Langkah keselamatan ketiga adalah bekerja dalam keadaan kering dan bersih. Kamar tamu memang kering, tetapi pemasang tetap harus memeriksa masuknya air, kondensasi, atau kebocoran di dekat kotak, dan menunda pekerjaan jika ada kelembapan. Area kerja harus dijaga bebas dari debu dan serpihan agar tidak ada yang jatuh ke dalam kotak yang terbuka selama penyambungan. Panduan instalasi saklar kartu kunci hotel juga mencatat bahwa pemasang tidak boleh bekerja pada sirkuit selagi peralatan kamar atau pendingin udara masih bertegangan dengan cara yang dapat memberi umpan balik pada pengkabelan kontrol, dan harus memastikan semua beban yang tersambung mati selama fase pengkabelan.
Langkah keselamatan keempat adalah menggunakan pelindung pribadi dan komponen dengan rating yang benar. Pemasang harus bekerja dengan alat berinsulasi, berdiri di permukaan non-konduktif bila memungkinkan, dan menggunakan voltage tester dengan sekring atau rating yang sesuai. Konduktor dan terminal harus dirating untuk arus yang akan dialirkannya, dan panel serta relai harus dirating untuk tegangan suplai kamar. Panduan instalasi saklar kartu kunci hotel menekankan bahwa memilih komponen dengan rating di atas beban dan suplai terukur, alih-alih tepat pada ratingnya, memberi margin keselamatan yang melindungi instalasi selama bertahun-tahun pemakaian.
Pertimbangan keselamatan kelima dalam panduan instalasi saklar kartu kunci hotel adalah tidak menimbulkan kegagalan titik tunggal baru. Pemasang harus menghindari penyambungan beban secara berantai pada kontak relai dengan cara yang membebani satu sambungan secara berlebihan, harus mengencangkan setiap terminal sesuai torsi yang ditentukan, dan harus memeriksa ulang setiap sambungan setelah beban kamar diterapkan. Lebih aman menyambungkan setiap sirkuit kamar pada kontak relai sendiri ketika unit menyediakan beberapa kanal daripada memadatkan beberapa sirkuit ke satu terminal, karena terminal tunggal yang longgar atau kelebihan beban adalah sumber umum panas dan kegagalan dini.
Panduan Instalasi Saklar Kartu Kunci Hotel: Menyalurkan Suplai Kamar ke Relai
Langkah kelistrikan inti dalam panduan instalasi saklar kartu kunci hotel adalah menyambungkan suplai kamar ke kontak relai. Pemasang pertama-tama mengidentifikasi suplai live yang masuk dari titik distribusi dan beban keluar yang menuju lampu, stopkontak, serta pendingin udara kamar. Kontak common relai menerima live yang masuk, dan kontak normally-open tersambung ke sisi beban, sehingga saat relai menutup, daya mengalir dari suplai melalui kontak ke kamar. Panduan instalasi saklar kartu kunci hotel meminta pemasang mengonfirmasi identifikasi kontak pada relai — common (C), normally open (NO), dan normally closed (NC) — dan memperingatkan bahwa tersambung ke kontak normally-closed karena kesalahan akan membuat kamar tetap bertegangan saat kartu tidak ada.
Konduktor netral ditangani sesuai desain saklar. Pada banyak saklar kartu kunci, pembaca dan kumparan relai mengambil daya dari sisi line dan netral diteruskan ke beban tanpa perubahan, sehingga pemasang menyambungkan netral langsung dari suplai ke beban kamar. Beberapa desain membutuhkan netral di panel untuk elektronikanya. Panduan instalasi saklar kartu kunci hotel menyatakan bahwa penanganan netral yang benar tertulis pada diagram pengkabelan, dan pemasang harus mengikutinya dengan tepat, karena membiarkan netral tidak tersambung dapat mencegah saklar beroperasi atau membuat sirkuit tidak aman pada desain shared-neutral.
Konduktor earth disambungkan ke terminal earth panel dan ke bagian bodi belakang yang dibumikan. Panduan instalasi saklar kartu kunci hotel memperlakukan pembumian sebagai wajib ketika unit menyediakan terminal earth, karena pelat belakang logam dan bagian konduktif yang terekspos harus diikat untuk perlindungan terhadap gangguan. Earth harus disambungkan dengan aman dan harus menerus sampai ke distribusi bumi kamar. Bila kotak yang ada tidak memiliki earth, pemasang harus menandai kekurangan tersebut alih-alih memasang panel tanpa pembumian, karena gangguan pada panel yang tidak dibumikan dapat mengalirkan tegangan ke bagian logam.
Pasangan kontrol antara saklar dan relai eksternal mana pun kemudian disalurkan. Jika unit menggerakkan relai eksternal, pemasang menarik pasangan berarus kecil dari keluaran kontrol panel ke terminal kumparan relai. Pasangan ini hanya mengalirkan arus penggerak kumparan, dari beberapa miliampere hingga beberapa ratus miliampere, sehingga bisa berukuran lebih kecil daripada suplai kamar, tetapi harus dilindungi dan disalurkan menjauhi tepi yang rusak atau tajam. Panduan instalasi saklar kartu kunci hotel meminta pemasang memberi label pada pasangan kontrol dengan jelas agar teknisi di kemudian hari tidak mengiranya sebagai konduktor beban dan mengejar gangguan yang tak ada.
Setelah semua konduktor tersambung, pemasang mengencangkan setiap terminal sesuai torsi yang ditentukan dan memeriksa ulang agar tidak ada helai konduktor multi-helai yang longgar atau terjepit ke terminal bersebelahan. Panduan instalasi saklar kartu kunci hotel menekankan pemeriksaan ulang ini karena konduktor yang longgar tidak terlihat oleh pandangan sekilas dan merupakan penyebab utama kontak intermiten, panas, dan kegagalan akhir. Setelah mengencangkan, pemasang harus menarik tiap konduktor dengan lembut untuk memastikan terpegang kuat sebelum memasang panel, karena menyambung ulang setelah panel terpasang jauh lebih merepotkan.
Panduan Instalasi Saklar Kartu Kunci Hotel: Menyambungkan Panel Saklar dan Sirkuit Kontrol
Dengan suplai dan beban telah tersambung, panduan instalasi saklar kartu kunci hotel beralih ke penyambungan terminal kontrol panel. Panel memiliki sekelompok kecil terminal: sisi input atau suplai pembaca, keluaran penggerak relai, dan terminal untuk bagian tunda atau override. Pemasang menyambungkan suplai line panel ke feed live, menyambungkan netral dan earth-nya sesuai diagram, dan menyambungkan keluaran kontrol relai ke kumparan relai atau input relai terintegrasi panel. Panduan instalasi saklar kartu kunci hotel menyarankan menata konduktor di dalam kotak agar panel dapat masuk tanpa terjepit, dan menyisakan kelonggaran cukup agar panel dapat ditarik keluar nanti untuk perawatan tanpa menegangkan terminal.
Relai terintegrasi panel, jika terpasang, menerima suplai kamar langsung pada terminal bebannya. Dalam hal itu pemasang menyambungkan live masuk ke common relai dan beban kamar keluar ke kontak normally-open, keduanya di dalam bodi belakang. Panduan instalasi saklar kartu kunci hotel mencatat bahwa unit berrelai terintegrasi membuat sambungan mandiri dan menghilangkan kebutuhan relai jarak jauh, tetapi juga berarti relai berada di dalam kotak flush, sehingga kotak harus punya ruang untuk relai ditambah pengkabelan tanpa sesak. Jika kotak sempit, pemasang harus menata ulang konduktor untuk menghindari tikungan tajam pada bodi relai.
Pengaturan tunda dan override diatur pada fase ini untuk model yang memungkinkan penyesuaian. Bila unit memiliki jumper, saklar rotary kecil, atau dip switch untuk nilai delay-off, pemasang mengaturnya ke nilai yang dipilih properti, umumnya 15 detik. Bila ada override manual untuk housekeeping, pemasang memastikannya berada pada posisi awal yang benar, biasanya dikendalikan kartu alih-alih menyala terus-menerus. Panduan instalasi saklar kartu kunci hotel meminta pemasang mengatur kontrol ini sekarang, dengan diagram di tangan, karena menyesuaikannya setelah muka terpasang itu merepotkan dan mudah terlupakan, menyisakan kamar dengan tunda yang tidak diinginkan atau sirkuit yang bertegangan terus-menerus.
Sambungan pembaca dikonfirmasi sebelum pemasangan akhir. Kepala pembaca kartu, baik slot magnetik maupun zona baca RFID, tersambung ke pengendali panel melalui ribbon tetap atau konektor yang dapat dicabut. Pemasang harus memasang konektor hingga penuh dan memverifikasi terkunci, karena konektor pembaca yang terpasang sebagian adalah gangguan intermiten klasik yang membuat saklar hanya bekerja sesekali. Panduan instalasi saklar kartu kunci hotel menyarankan mengonfirmasi pembaca terdeteksi dengan mengamati perilaku indikator panel selama pengujian, karena kebanyakan unit menyalakan lampu saat pembaca dan pengendali berkomunikasi.
Lubang masuk kabel disegel sebelum panel diamankan. Setiap knockout atau lubang masuk yang tidak terpakai harus ditutup agar debu dan serangga tidak masuk ke kotak, dan gland atau grommet harus melindungi kabel di tempatnya melewati bodi belakang. Panduan instalasi saklar kartu kunci hotel memperlakukan penyegelan ini sebagai langkah keandalan kecil tetapi nyata, karena kotak yang tersegel menjaga elektronik tetap bersih, mencegah masuknya kelembapan, dan menghindari panggilan perbaikan yang ditimbulkan kotak yang terganggu seiring waktu.
Panduan Instalasi Saklar Kartu Kunci Hotel: Memasang Panel Flush dan Mengamankan Bodi Belakang
Pemasangan, dalam panduan instalasi saklar kartu kunci hotel, dimulai dengan memasukkan bodi belakang ke kotak dinding. Bodi belakang dimasukkan ke kotak single-gang, dengan pengkabelannya disalurkan melalui lubang masuk dan lubang sekrupnya sejajar dengan telinga kotak. Pemasang menurunkan bodi ke dalam, memastikan konduktor tidak terjepit antara bodi dan dinding kotak, serta kelenturan kabel tidak menarik terminal sampai longgar. Panduan instalasi saklar kartu kunci hotel meminta pemasang memasang bodi hingga penuh sehingga flensa pemasangannya duduk rata dengan permukaan dinding, yakni titik ketika penanaman 29mm panel mengisi kedalaman kotak dengan rapi.
Bodi belakang kemudian diamankan. Sebagian besar unit dipasang ke telinga kotak dengan dua sekrup pemasangan, dan beberapa juga dipasang ke rangka atau langsung ke dinding. Pemasang mengencangkan sekrup secara merata, bergantian di antara dua atau empat titik pemasangan, agar bodi duduk tegak dan tidak miring. Panduan instalasi saklar kartu kunci hotel memperingatkan agar tidak mengencangkan berlebihan, yang dapat meretakkan bodi belakang plastik atau merusak ulir pemasangan, dan agar tidak kurang kencang, yang membuat panel longgar dan goyang. Tujuannya adalah dudukan yang kuat dan rata dengan flensa tertahan rata ke dinding di semua sisi.
Pelat muka kemudian diklip atau disekrup di atas bodi belakang. Muka mengunci di atas flensa, menutupi sekrup dan kotak, serta memuat slot kartu atau zona baca RFID dan lampu indikator. Pemasang menyelaraskan muka agar slot kartu segaris dengan pembaca dan pelat sejajar dengan dinding, lalu menguncinya pada tempatnya. Panduan instalasi saklar kartu kunci hotel mencatat bahwa muka harus menempel bersih dengan bunyi klik atau sekrup yang terpasang, dan muka yang tidak mau duduk kembali setelah dilepas biasanya menandakan konduktor terjepit atau bodi belakang sedikit tidak sejajar yang harus diperbaiki sebelum kamar diselesaikan.
Setelah muka terpasang, pemasang memeriksa keselarasan dan kelonggaran slot kartu. Kartu harus meluncur ke slot magnetik dengan hambatan ringan dan merata, dan zona baca RFID harus dapat diakses pada muka tanpa halangan. Panduan instalasi saklar kartu kunci hotel meminta pemasang memasukkan dan mencabut kartu beberapa kali segera setelah pemasangan untuk memastikan slot tidak tersumbat dan pembaca beroperasi melalui muka, karena keselarasan yang sedikit meleset jauh lebih mudah diperbaiki sebelum muka disegel dan kamar diserahkan.
Terakhir pada tahap pemasangan, pemasang memverifikasi panel rata dan muka tidak menonjol atau bergoyang. Panel yang selesai harus duduk datar dan stabil, tanpa gerakan saat kartu dimasukkan atau indikator ditekan. Panduan instalasi saklar kartu kunci hotel memperlakukan hasil akhir yang stabil, rata, dan terpasang flush sebagai bagian dari serahan, karena panel miring atau longgar terlihat sebagai instalasi yang buruk meskipun secara kelistrikan bekerja sempurna, dan mengundang tamu untuk mengutak-atik perangkat yang tampak tidak terpasang baik.
Panduan Instalasi Saklar Kartu Kunci Hotel: Menyambungkan dan Memasang Relai Eksternal atau Kontaktor
Untuk kamar yang bebannya melebihi rating relai internal saklar, panduan instalasi saklar kartu kunci hotel membahas sambungan relai eksternal secara rinci. Relai eksternal atau kontaktor dipasang di titik yang sesuai, baik pada rel DIN di papan distribusi maupun pada pelat belakang dekat saklar. Suplai kamar disalurkan melalui kontak utama kontaktor, dan pasangan kontrol berarus kecil saklar tersambung ke kumparan kontaktor. Panduan instalasi saklar kartu kunci hotel meminta pemasang memastikan tegangan kumparan kontaktor cocok dengan keluaran kontrol saklar, karena ketidakcocokan berarti kumparan tidak pernah menarik dan kamar tidak pernah berdaya.
Pengkabelan kontak utama kontaktor mengikuti logika common-dan-normally-open yang sama seperti relai internal. Live masuk ditempatkan pada sisi line kontaktor, beban kamar keluar pada sisi beban, dan saat kumparan bertegangan, kontak menutup untuk melengkapi sirkuit kamar. Panduan instalasi saklar kartu kunci hotel memastikan kontaktor dipilih sehingga rating kontak utamanya melebihi beban kamar terukur dengan margin, dan kumparannya menerima sinyal kontrol saklar, baik itu tegangan line maupun keluaran DC bertegangan rendah tergantung modelnya.
Pengkabelan kontrol dari saklar ke kumparan kontaktor adalah bagian yang paling sensitif terhadap sambungan yang salah. Pemasang menyalurkan pasangan berlabel jelas dari keluaran kontrol panel ke terminal kumparan kontaktor, memperhatikan polaritas jika kumparan ber-DC atau jika unit menandainya. Panduan instalasi saklar kartu kunci hotel meminta pemasang menghindari menarik pasangan kontrol berdampingan dengan kabel berarus besar bila memungkinkan, atau memakai pasangan berpelindung (screened) jika harus berjalan bersama, untuk mencegah derau terinduksi membalik kumparan. Sirkuit kontrol harus diberi sekring atau dilindungi sesuai diagram, karena tanpa itu korslet pada pasangan kontrol dapat mengalirkan gangguan ke panel.
Kontaktor harus dipasang agar panasnya terbuang. Kontaktor yang mengalirkan arus menghasilkan sedikit panas pada kumparan dan kontaknya, sehingga membutuhkan ruang sela dan ventilasi alih-alih terkubur rapat di ruang tertutup. Panduan instalasi saklar kartu kunci hotel menyarankan memasang kontaktor dengan sedikit ruang udara, mengamankannya dengan kuat agar tidak bergetar atau bergoyang, dan membiarkan terminalnya mudah dijangkau untuk perawatan. Kontaktor yang kepanasan atau longgar memperpendek umur kumparan dan kontak serta lebih sulit dirawat saat akhirnya butuh perhatian.
Terakhir, pemasang memberi label pada relai eksternal dengan jelas. Catatan pada atau di samping kontaktor yang menyatakan itu adalah relai kartu kunci untuk nomor kamar tertentu memudahkan perawatan menemukannya dengan cepat dan menghindari seseorang mengkabelnya ulang karena keliru pada pekerjaan berikutnya. Panduan instalasi saklar kartu kunci hotel memperlakukan pelabelan sebagai bagian standar instalasi profesional, karena relai tanpa label di papan distribusi adalah tebakan mahal bagi teknisi berikutnya, dan yang berlabel mengubah diagnostik menjadi pekerjaan dua menit.
Panduan Instalasi Saklar Kartu Kunci Hotel: Menguji Penyisipan Kartu dan Operasi Relai
Pengujian adalah titik di mana panduan instalasi saklar kartu kunci hotel memastikan pengkabelan benar-benar berfungsi, dan harus selalu dilakukan pada lampu dummy sebelum kamar diserahkan. Pemasang menyambungkan lampu uji sederhana atau beban resistif kecil pada sirkuit yang dikendalikan saklar, mengisolasi beban riil kamar, dan memulai pengujian dengan sirkuit masih dikendalikan dari titik aman. Panduan instalasi saklar kartu kunci hotel menuntut beban dummy pada uji pertama karena mencegah kesalahan pengkabelan menghidupkan sirkuit riil kamar secara tak terduga, dan karena mengisolasi perilaku saklar dari gangguan beban apa pun.
Uji pertama adalah uji penyisipan kartu. Dengan kartu valid dari medium yang benar dimasukkan ke slot atau ditempelkan ke pembaca, indikator panel harus berubah dan relai harus menutup dalam sekitar satu detik, menghidupkan lampu uji. Jika lampu tidak menyala, pemasang memeriksa medium kartu, sambungan pembaca, pengkabelan relai, dan suplai panel dalam urutan itu. Panduan instalasi saklar kartu kunci hotel menyarankan penelusuran gangguan bertahap: kartu dikenali, sinyal baca mencapai pengendali, pengendali menggerakkan relai, kontak menutup, beban menghantar, dan membangun konfirmasi tiap langkah sebelum pindah ke langkah berikutnya.
Uji kedua adalah uji delay-off. Dengan kartu dicabut, relai harus tetap tertutup selama tunda yang diatur, umumnya 15 detik, lalu membuka dan memutus lampu uji. Pemasang mengukurnya dengan stopwatch atau indikator panel sendiri dan memastikan tunda sesuai nilai yang dikonfigurasi. Panduan instalasi saklar kartu kunci hotel meminta pemasang mengulang uji ini beberapa kali, dan juga memasukkan kembali kartu selama jendela tunda untuk memastikan saklar menghidupkan kembali tanpa beralih, karena saklar yang keliru beralih saat penyisipan ulang membingungkan dan harus diperbaiki sebelum serah terima.
Uji ketiga adalah pemeriksaan override, bila unit memiliki override manual untuk housekeeping. Pemasang mengaktifkan override dan memastikan lampu uji menyala tanpa kartu, lalu mereset override dan memastikan saklar kembali ke operasi yang dikendalikan kartu dan lampu terputus dengan tunda setelah kartu dicabut. Panduan instalasi saklar kartu kunci hotel memperlakukan override yang berfungsi sebagai persyaratan hanya jika properti menggunakannya untuk kebersihan, tetapi tetap harus diverifikasi baik digunakan maupun tidak agar perilakunya diketahui.
Uji keempat adalah pemeriksaan operasi berulang dan stabilitas. Pemasang memasukkan dan mencabut kartu mungkin dua puluh kali dan memastikan relai membuka dan menutup andal pada setiap siklus tanpa macet atau bergetar, dan panel tidak panas berlebih. Panduan instalasi saklar kartu kunci hotel menyarankan uji ketahanan ini pada satu sampel sebelum diterapkan ke seluruh properti, karena kegagalan yang terungkap — terminal longgar, dudukan pembaca yang intermiten, relai yang marginal — persislah yang jika tidak akan muncul di kamar tamu yang aktif.
Panduan Instalasi Saklar Kartu Kunci Hotel: Memverifikasi Timer Delay-Off dan Menyesuaikan Pengaturan
Mengatur dan memverifikasi timer delay-off adalah langkah tersendiri dalam panduan instalasi saklar kartu kunci hotel. Sebagian besar unit memilih tunda dengan jumper, saklar rotary kecil, dip switch, atau potensiometer onboard, dan pemasang mengaturnya ke nilai yang dipilih properti, umumnya 15 detik. Pengaturan harus dilakukan dengan unit terdokumentasi, karena posisi selektor mudah salah baca terhadap legenda cetak kecil. Panduan instalasi saklar kartu kunci hotel meminta pemasang mengatur tunda sebagai bagian dari fase pengkabelan, lalu memverifikasinya pada fase pengujian agar keduanya tidak terpisah oleh penyesuaian yang terlupakan.
Tunda berperilaku sebagai interval tetap sejak saat kartu dicabut. Pemasang harus memastikan timer mulai pada pencabutan kartu alih-alih pada peristiwa lain, dan bahwa semua sirkuit terkendali terputus bersamaan saat timer habis. Panduan instalasi saklar kartu kunci hotel mencatat bahwa beberapa unit dua kanal mengatur waktu kanal pencahayaan dan pendingin udara secara berbeda, membiarkan pencahayaan terputus setelah tunda singkat sementara perangkat terkendali mati lebih lambat, dan pemasang harus memverifikasi tunda setiap kanal terhadap konfigurasi yang diharapkan.
Jika properti memiliki banyak tipe kamar atau kebiasaan housekeeping yang berbeda, tunda mungkin perlu berbeda per kamar. Panduan instalasi saklar kartu kunci hotel menyarankan mencatat tunda yang dipilih per tipe kamar pada catatan instalasi agar pengaturan dapat dilacak, dan menguji satu sampel dari setiap tipe kamar alih-alih mengasumsikan satu pengaturan cocok untuk semua. Bawaan seragam mencakup kebanyakan kamar, tetapi pengendali pendingin udara yang mematikan lambat di satu sayap mungkin membenarkan tunda lebih panjang untuk sayap itu, dan mendokumentasikannya mencegah kebingungan nanti.
Pemasang juga harus memastikan tunda stabil pada siklus berulang. Timer yang menyimpang, terpicu terlalu dini, atau kadang gagal membuka sirkuit sepenuhnya adalah gangguan, bukan toleransi, dan pemasang harus mengganti atau memperbaiki unit alih-alih menerimanya. Panduan instalasi saklar kartu kunci hotel memperlakukan timer yang andal dan dapat diulang sebagai standar kualitas, karena saklar penghemat energi yang sembarangan membiarkan kamar bertegangan meruntuhkan seluruh tujuan instalasi.
Verifikasi tunda diakhiri dengan memasukkan kembali kartu selama hitung mundur dan memastikan relai tetap terkunci pada siklus berulang. Pemeriksaan satuan perilaku ini memastikan saklar membaca kartu yang dimasukkan ulang sebagai kelanjutan, bukan peristiwa baru. Panduan instalasi saklar kartu kunci hotel menutup langkah ini dengan memastikan nilai tunda akhir diatur sesuai kebutuhan properti, tercatat pada lembar as-built, dan konsisten di semua kamar yang dipasang dalam kampanye yang sama.
Panduan Instalasi Saklar Kartu Kunci Hotel: Commissioning Kamar dan Menuntaskan Serah Terima
Commissioning adalah fase akhir dari panduan instalasi saklar kartu kunci hotel, di mana beban riil kamar disambungkan kembali dan instalasi dikonfirmasi berfungsi dalam kondisi sungguhan. Pemasang menghidupkan kembali sirkuit riil kamar, menyambungkan lampu, stopkontak, dan pendingin udara yang sebenarnya ke suplai yang dikendalikan saklar, dan menjalankan uji penyisipan kartu sekali lagi dengan beban riil alih-alih lampu dummy. Panduan instalasi saklar kartu kunci hotel meminta pemasang memastikan relai menanggung beban riil kamar tanpa panas berlebih atau berdengung, dan bahwa setiap sirkuit yang dikendalikan saklar benar-benar menyala.
Pemeriksaan commissioning kedua adalah lolos fungsi penuh pada setiap fitur terkendali. Pemasang memastikan setiap lampu, setiap stopkontak, dan pendingin udara merespons kartu dengan benar: semua hidup saat kartu dimasukkan, semua terputus bersama setelah tunda saat kartu dicabut. Panduan instalasi saklar kartu kunci hotel meminta pemasang melibatkan pasangan mata kedua atau daftar periksa agar tidak ada sirkuit terlewat, karena retrofit yang menyisakan satu stopkontak tak tersakelar selamanya atau satu lampu tak terkendali adalah cacat yang muncul hanya saat tamu mengeluh.
Pemeriksaan ketiga adalah kerapian dan keselamatan pada kotak. Pemasang memastikan semua konduktor teraman, terminal kencang, lubang masuk tak terpakai tersegel, dan panel serta relai eksternal apa pun terpasang kokoh. Panduan instalasi saklar kartu kunci hotel memperlakukan kotak yang selesai sebagai serahan: rapi, tanpa kabel telanjang, tanpa kesesakan, dan panel yang duduk rata dan sejajar. Inspeksi akhir ini menangkap pekerjaan longgar yang bisa lolos uji fungsional tetapi menimbulkan gangguan atau masalah nanti.
Pemeriksaan keempat adalah mengembalikan kamar ke layanan dan menyerahkannya. Pemasang memastikan kamar ditinggalkan dengan saklar kartu dalam keadaan normal yang dikendalikan kartu, resepsionis diberi tahu bahwa unit sudah aktif, dan kamar bersih serta selesai dengan benar sebelum dilepas. Panduan instalasi saklar kartu kunci hotel mencatat bahwa staf housekeeping harus diberi tahu perilaku dasarnya — masukkan kartu untuk daya, cabut untuk memutus setelah tunda — agar mereka tidak mengira delay-off yang disengaja sebagai gangguan, dan agar mereka menggunakan override dengan benar jika ada yang terpasang.
Terakhir, pemasang mencatat instalasi yang selesai. Catatan as-built harus mencantumkan nomor kamar, model, medium kartu, tunda yang diatur, perilaku override, dan pengaturan apa pun yang menyimpang dari bawaan. Panduan instalasi saklar kartu kunci hotel menyarankan menyimpan catatan ini per kamar untuk seluruh properti, karena membuat layanan berikutnya, pemesanan suku cadang, dan penelusuran gangguan jauh lebih cepat. Catatan yang lengkap dan akurat mengubah retrofit dari instalasi sekali jadi menjadi bagian yang terkelola dari perawatan kelistrikan properti yang berkelanjutan.
Panduan Instalasi Saklar Kartu Kunci Hotel: Retrofit tanpa Downtime
Panduan instalasi saklar kartu kunci hotel paling bernilai bagi hotel yang beroperasi ketika pemilik dapat meretrofit tanpa menarik kamar dari layanan terlalu lama. Pendekatan praktisnya adalah mengelompokkan pekerjaan per lantai dan menjadwalkan setiap kamar saat lowong alaminya, bukan menutup satu sayap penuh sekaligus. Setiap kamar biasanya membutuhkan kurang dari satu jam kerja aktif setelah elektrisi terlatih, sehingga tim dua orang dapat bergerak melintasi satu lantai secara efisien sementara bagian penjualan menyelaraskan pekerjaan dengan okupansi. Panduan meminta pemasang memastikan tata letak kamar sebelum memulai, melepas hanya pelat muka dan saklar yang diganti, serta menjaga perabot dan finishing kamar tamu terlindungi selama penggantian. Untuk proyek bertahap, pemilik menstandarkan satu medium kartu dan satu pengaturan tunda di setiap sayap agar perilakunya seragam bagi tamu maupun housekeeping. Panduan instalasi saklar kartu kunci hotel yang merencanakan tahapan, melindungi finishing, dan menstandarkan konfigurasi mengubah retrofit besar menjadi rangkaian kunjungan kamar singkat dan terduga alih-alih proyek yang mengganggu, itulah sebabnya pengiriman bertahap kini menjadi bawaan untuk properti yang terisi.
Sebagian konten artikel ini dihasilkan oleh AI dan dioptimalkan untuk akurasi profesional serta keterbacaan.
A hotel key card switch installation guide is a step-by-step method for fitting a card-controlled power switch into a guest room, covering box preparation, electrical isolation, wiring the line and load to the relay, mounting the flush panel, testing card insertion, and verifying the delay-off timer. A hotel key card switch installation guide is written for electricians, maintenance staff, and system integrators who retrofit rooms without major rewiring, and it treats safety isolation at the distribution point as the first step. A hotel key card switch installation guide leads the installer through the sequence: confirming the box fits the panel, landing the room feed on the relay contacts, routing a low-current control pair to the plate, securing the panel, and confirming the relay closes and the delay-off works before the circuit opens. A hotel key card switch installation guide makes clear the job is a panel swap plus a relay connection, not a rewire of the room.
Preparing the Room for a Hotel Key Card Switch Installation Guide
The preparation phase of any hotel key card switch installation guide begins with confirming the wall box and the panel fit. The most common unit is a flush panel of roughly 86mm by 86mm, with a back body about 48mm deep, of which roughly 29mm sits inside the wall when mounted. Before cutting anything, the installer should measure the existing single-gang box — its depth, its screw ears, and its footprint — and compare them to the switch's back-body dimensions. A hotel key card switch installation guide treats box fit as a pre-install verification because a panel that does not sit flush in a shallow box will not mount cleanly, and cutting a deeper box in finished plaster is far more disruptive than the wiring itself. If the box is too shallow or damaged, the installer must either fit a box extender or choose a surface-mount variant before proceeding.
The second preparation step in a hotel key card switch installation guide is gathering the tools and materials. The installer needs a voltage tester or multimeter, screwdrivers matching the terminal and fixing screws, a small flat blade for the terminals, wire strippers, cable cutters, and the panel's mounting hardware. The materials include properly sized conductors for the relay contacts, a control pair to the panel, cable glands or grommets where the cable enters the box, and any adapter plates needed for the box. A hotel key card switch installation guide advises laying these out before starting so the installer is not interrupted mid-connection, and cautions that every connection must be made with the circuit isolated.
The third preparation step is identifying the room circuit and the load path. The installer must know which breaker or fuse at the distribution point feeds this room, and must trace how the live feed reaches the switch position and how the load leads onward to the lights, the sockets, and the air-conditioning thermostat. A hotel key card switch installation guide has the installer map the existing wiring on a sketch or photograph before touching anything, because the room feed must be routed through the relay contacts while only a control pair goes to the panel. Misunderstanding which cable is the incoming feed and which is the outgoing load is the most common source of an installation that powers the panel but does not switch the room.
The fourth preparation step is confirming the supply voltage and polarity. The installer should verify the measured voltage at the box matches the switch's rated input, typically 110V or 180–250V AC, before connection. A hotel key card switch installation guide insists on a live-voltage check with a meter rather than trusting the label, because a misidentified feed or a stray voltage can damage the panel or create a shock hazard. The live conductor polarity should be confirmed if the unit's terminals are marked, because landing the line on the wrong terminal is a frequent cause of a panel that hums, fails to switch, or eventually fails.
The fifth preparation step is deciding whether a built-in relay or an external relay will be used. If the switch has a built-in relay, the installer routes the room feed directly to the panel's load terminals. If the model needs an external relay or contactor because the room load exceeds the internal rating, the installer must locate a mounting point for that relay, close to the panel or at the distribution board, and run a control pair between the two. A hotel key card switch installation guide treats this decision as part of preparation so that the right relay, the right cable, and the right mounting position are ready before the power is isolated.
Safety Isolation in a Hotel Key Card Switch Installation Guide
Safety is the first commandment of any hotel key card switch installation guide, and it starts with isolating the room circuit at the distribution point. Before any cover is opened, the installer must switch off the circuit breaker or withdraw the fuse feeding the room and lock or tag the isolation point so no one re-energizes it during work. A hotel key card switch installation guide treats lockout-tagout as non-negotiable, because a helper or a returning electrician who flips the wrong breaker while a hand is in the box can cause a serious injury. The isolation must be confirmed with a voltage tester on the conductors at the switch position, not assumed from the breaker position.
The second safety step in a hotel key card switch installation guide is verifying zero voltage at the exact terminals to be worked. Voltage can be present even with the breaker off if a feed is shared, if a different circuit wanders through the box, or if there is a stray capacitance in the cable. The installer should test between live and neutral, between live and earth, and between live and live at the box and find no voltage before connecting. A hotel key card switch installation guide advises testing at the terminals, not just at a remote point, because a shared neutral or miswired feed elsewhere can leave the box live.
The third safety step is working dry and clean. Guest rooms are dry, but the installer should still check for water ingress, condensation, or leaks near the box, and postpone the work if moisture is present. The work area should be kept free of dust and debris so nothing falls into the open box during connection. A hotel key card switch installation guide also notes that the installer should not work on the circuit while the room's appliances or the air-conditioning remain energized in a way that could back-feed the control wiring, and should ensure all connected loads are off during the wiring phase.
The fourth safety step is using correctly rated personal and component protection. The installer should work with insulated tools, stand on a non-conductive surface where possible, and use a fused or appropriately rated voltage tester. The conductors and terminals must be rated for the current they will carry, and the panel and relay must be rated for the room's supply voltage. A hotel key card switch installation guide emphasizes that choosing components rated above the measured load and supply, rather than at the exact rating, leaves a safety margin that protects the installation over years of service.
The fifth safety consideration in a hotel key card switch installation guide is not introducing new single-point failures. The installer should avoid daisy-chaining loads on the relay contacts in a way that overloads one connection, should tighten every terminal to its specified torque, and should re-check each connection after the room's load is applied. It is safer to land each room circuit on its own relay contact where the unit provides multiple channels than to crowd several circuits onto one terminal, because a loose or overloaded single terminal is a common source of heat and premature failure.
Hotel Key Card Switch Installation Guide: Wiring the Room Feed to the Relay
The core electrical step in a hotel key card switch installation guide is landing the room feed on the relay contacts. The installer first identifies the incoming live feed from the distribution point and the outgoing load that leads to the room's lights, sockets, and air-conditioning. The relay's common contact accepts the incoming live, and the normally-open contact connects to the load side, so that when the relay closes, power flows from the feed through the contacts to the room. A hotel key card switch installation guide has the installer confirm the contact identification on the relay — common (C), normally open (NO), and normally closed (NC) — and warns that wiring into the normally-closed contact by mistake leaves the room powered when the card is absent.
The neutral conductor is handled according to the switch's design. On many key card switches, the reader and relay coil draw from the line side and the neutral is passed through to the load unchanged, so the installer connects the neutral straight through from the supply to the room load. A few designs require a neutral at the panel for the electronics. A hotel key card switch installation guide says the correct neutral treatment is stated on the wiring diagram, and the installer should follow it exactly, because leaving a neutral unconnected can prevent the switch from operating or leave the circuit unsafe on a shared-neutral design.
The earth conductor is connected to the panel's earth terminal and to any earthed parts of the back body. A hotel key card switch installation guide treats earthing as mandatory where the unit provides an earth terminal, because the metal back plate and any exposed conductive parts must be bonded to protect against a fault. The earth should be landed securely and should be continuous to the room's earthed distribution. Where the existing box has no earth, the installer should flag the deficiency rather than connect the panel un-ear, because a fault on an un-ear panel can energize the metalwork.
The control pair between the switch and any external relay is then routed. If the unit drives an external relay, the installer runs a low-current pair from the panel's control output to the relay coil terminals. This pair carries only the coil drive current, a few milliamps to a few hundred milliamps, so it can be smaller-gauge than the room feed, but it must be protected and routed away from damaged or sharp edges. A hotel key card switch installation guide has the installer label the control pair clearly so a future technician does not mistake it for a load conductor and chase a phantom fault.
Once all conductors are landed, the installer tightens every terminal to its specified torque and double-checks that no strand of a multi-strand conductor is loose or pinched against an adjacent terminal. A hotel key card switch installation guide emphasizes this re-check because a loose conductor is invisible to a visual glance and is a leading cause of intermittent contact, heat, and eventual failure. After tightening, the installer should gently tug each conductor to confirm it is held firmly before mounting the panel, because reconnecting after the panel is in place is far more awkward.
Hotel Key Card Switch Installation Guide: Connecting the Switch Panel and Control Circuit
With the feed and load landed, a hotel key card switch installation guide moves to connecting the panel's control terminals. The panel has a small set of terminals: the input side or the reader supply, the relay drive output, and any terminals for the delay or override section. The installer connects the panel's line supply to the live feed, connects its neutral and earth per the diagram, and lands the relay control output on the relay coil or the panel's own integrated relay input. A hotel key card switch installation guide advises organizing the conductors in the box so the panel slides in without pinching, and leaving enough slack that the panel can be withdrawn later for service without straining the terminals.
The panel's integrated relay, where fitted, receives the room feed directly on its load terminals. In that case the installer lands the incoming live on the relay common and the outgoing room load on the normally-open contact, both within the back body. A hotel key card switch installation guide notes that an integrated-relay unit makes the connection self-contained and removes the need for a remote relay, but it also means the relay is inside the flush box, so the box must have room for the relay plus the wiring without overcrowding. If the box is tight, the installer should re-route the conductors to avoid sharp bends against the relay body.
The delay and override settings are set during this phase for models that allow adjustment. Where the unit has a jumper, a small rotary switch, or a dip switch for the delay-off value, the installer sets it to the value chosen by the property, commonly 15 seconds. Where a manual override for housekeeping exists, the installer confirms it is in the correct starting position, normally card-controlled rather than permanently on. A hotel key card switch installation guide has the installer set these controls now, with the diagram in hand, because adjusting them after the face is mounted is awkward and easily forgotten, leaving the room with an unintended delay or a permanently energized circuit.
The reader connection is confirmed before final mounting. The card reader head, whether a magnetic slot or an RFID read zone, connects to the panel's controller either through a fixed ribbon or a pluggable connector. The installer should seat the connector fully and verify it latches, because a partially seated reader connector is a classic intermittent fault that makes the switch work only intermittently. A hotel key card switch installation guide advises confirming the reader is detected by observing the panel's indicator behavior during the test, since most units light a lamp when the reader and controller are communicating.
The wiring entries are sealed before the panel is secured. Any knockout or entry not used should be closed so dust and insects cannot enter the box, and gland or grommet should protect the cable where it passes through the back body. A hotel key card switch installation guide treats this sealing as a small but real reliability step, because a sealed box keeps the electronics clean, prevents moisture intrusion, and avoids the service calls that a compromised box invites over time.
Hotel Key Card Switch Installation Guide: Mounting the Flush Panel and Securing the Back Body
Mounting begins, in a hotel key card switch installation guide, with fitting the back body into the wall box. The back body slides into the single-gang box, with its wiring routed through the entries and its screw holes aligned to the box's ears. The installer lowers the body in, making sure the conductors are not trapped between the body and the box wall, and that the flex of the cable does not pull a terminal loose. A hotel key card switch installation guide has the installer seat the body fully so its mounting flange sits flush against the wall surface, which is the point at which the panel's 29mm embedment fills the box depth cleanly.
The back body is then secured. Most units fix to the box ears with two mounting screws, and some also fix to a frame or directly to the wall. The installer tightens the screws evenly, alternating between the two or four fixing points, so the body seats square and does not tilt. A hotel key card switch installation guide warns against over-tightening, which can crack a plastic back body or strip the mount, and against under-tightening, which leaves the panel loose and wobbly. The goal is a firm, level seat with the flange held flat against the wall on all sides.
The face plate is then clipped or screwed over the back body. The face locks over the flange, covering the screws and the box, and carries the card slot or the RFID read zone and any indicator lamp. The installer aligns the face so the card slot lines up with the reader and so the plate is level with the wall, then locks it in place. A hotel key card switch installation guide notes that the face should engage cleanly with a click or a seated screw, and that a face that will not seat again after removal usually signals a trapped conductor or a slightly misaligned back body that must be corrected before the room is finished.
After the face is on, the installer checks the alignment and clearance of the card slot. The card should slide into a magnetic slot with light, even resistance, and the RFID read zone should be accessible on the face without obstruction. A hotel key card switch installation guide has the installer insert and withdraw a card several times immediately after mounting to confirm the slot is not blocked and the reader operates through the face, because a subtle misalignment is far easier to fix before the face is sealed and the room is handed over.
Finally at the mounting stage, the installer verifies the panel is level and that the face does not protrude or rock. The finished panel should sit flat and stable, with no movement when a card is inserted or the indicator is pressed. A hotel key card switch installation guide treats a stable, level, flush-mount finish as part of the deliverable, because a crooked or loose panel reads as a poor installation even when electrically it works perfectly, and it invites the guest to tamper with a device that does not look well-fitted.
Hotel Key Card Switch Installation Guide: Connecting and Mounting an External Relay or Contactor
For rooms whose load exceeds the switch's internal relay rating, a hotel key card switch installation guide covers external relay connection in detail. The external relay or contactor is mounted at a suitable point, either on a DIN rail at the distribution board or on a backplate near the switch. The room feed is routed through the contactor's main contacts, and the switch's low-current control pair connects to the contactor coil. A hotel key card switch installation guide has the installer confirm the contactor's coil voltage matches the switch's control output, because a mismatch means the coil never pulls in and the room never powers.
The contactor's main contact wiring follows the same common-and-normally-open logic as the internal relay. The incoming live lands on the contactor's line side, the outgoing room load lands on the load side, and when the coil is energized the contacts close to complete the room circuit. A hotel key card switch installation guide confirms the contactor is selected so its main contact rating exceeds the measured room load with margin, and that its coil accepts the switch's control signal, whether that is the line voltage or a low-voltage DC output depending on the model.
The control wiring from the switch to the contactor coil is the piece most sensitive to wrong connection. The installer routes a clearly labeled pair from the panel's control output to the contactor's coil terminals, observing polarity if the coil is DC or if the unit marks it. A hotel key card switch installation guide has the installer avoid running the control pair alongside high-current cables where possible, or use a screened pair if they must run together, to prevent induced noise from toggling the coil. The control circuit should be fused or protected per the diagram, because a short on the control pair could otherwise feed a fault into the panel.
The contactor should be mounted to dissipate its heat. A current-carrying contactor produces some heat in its coil and contacts, so it needs clearance and ventilation rather than being buried tightly in an enclosed space. A hotel key card switch installation guide advises mounting the contactor with a little airspace, securing it firmly so it cannot vibrate or rock, and leaving its terminals accessible for service. A heat-soaked or loose contactor shortens coil and contact life and is harder to service when it eventually needs attention.
Finally, the installer labels the external relay clearly. A note on or beside the contactor stating it is the key card relay for a specific room number lets maintenance find it quickly and avoids someone re-wiring it by mistake during later work. A hotel key card switch installation guide treats labeling as a standard part of professional installation, because an unlabeled relay at a distribution board is a costly guess for the next technician, and a labeled one turns a diagnostic into a two-minute job.
Hotel Key Card Switch Installation Guide: Testing Card Insertion and Relay Operation
Testing is the point where a hotel key card switch installation guide confirms the wiring actually works, and it should always be done on a dummy lamp before the room is handed over. The installer connects a simple test lamp or a small resistive load on the switched circuit, isolates the room's real load, and starts the test with the circuit still controlled from a safe point. A hotel key card switch installation guide insists on the dummy load on first test because it prevents a wiring error from energizing the room's real circuits unexpectedly, and because it isolates the switch's behavior from any load fault.
The first test is the card-insertion test. With a valid card of the correct medium inserted into the slot or held against the reader, the panel's indicator should change and the relay should close within about one second, energizing the test lamp. If the lamp does not light, the installer checks the card medium, the reader connection, the relay wiring, and the panel supply in that order. A hotel key card switch installation guide advises troubleshooting stepwise: card recognized, read signal reaches the controller, controller drives the relay, contacts close, load conducts, and building each step's confirmation before moving to the next.
The second test is the delay-off test. With the card removed, the relay should stay closed for the set delay, typically 15 seconds, then open and cut the test lamp. The installer times this with a stopwatch or the panel's own indicator and confirms the delay matches the configured value. A hotel key card switch installation guide has the installer repeat this test a few times, and also reinsert the card during the delay window to confirm the switch re-energizes without toggling, because a switch that erroneously toggles on a reinsertion is confusing and should be corrected before handover.
The third test is the override check, where the unit has a manual override for housekeeping. The installer engages the override and confirms the test lamp energizes without a card, then resets the override and confirms the switch returns to card-controlled operation and the lamp cuts on delay after card removal. A hotel key card switch installation guide treats a functioning override as a requirement only if the property uses it for cleaning, but it should be verified either way so its behavior is known.
The fourth test is a repeat-operation and stability check. The installer inserts and removes the card perhaps twenty times and confirms the relay opens and closes reliably on every cycle without sticking or chattering, and that the panel does not overheat. A hotel key card switch installation guide advises this endurance pass on a sample before committing the whole property, because the failures it reveals — a loose terminal, an intermittent reader seat, a marginal relay — are exactly the ones that would otherwise surface in a live guest room.
Hotel Key Card Switch Installation Guide: Verifying the Delay-Off Timer and Adjusting the Setting
Setting and verifying the delay-off timer is its own step in a hotel key card switch installation guide. Most units select the delay with a jumper, a small rotary switch, a dip switch, or an on-board potentiometer, and the installer sets it to the value the property chose, commonly 15 seconds. The setting should be made with the unit documented, because the selector position is easy to misread against a small print legend. A hotel key card switch installation guide has the installer set the delay as part of the wiring phase, then verify it in the test phase so the two are not separated by a forgotten adjustment.
The delay behaves as a fixed interval from the moment the card is removed. The installer should confirm the timer starts on card removal rather than on any other event, and that all the switched circuits drop together when the timer elapses. A hotel key card switch installation guide notes that some two-channel units time the lighting and the air-conditioning channels differently, letting the lighting drop after a short delay while a controlled device shuts down more slowly, and the installer should verify each channel's delay against the expected configuration.
If the property has multiple room types or different housekeeping habits, the delay may need to differ by room. A hotel key card switch installation guide advises recording the chosen delay per room type on the installation record so the settings are traceable, and testing one sample of each room type rather than assuming one setting fits all. A uniform default covers most rooms, but a slow-shutting air-conditioning controller in one wing might justify a longer delay for that wing, and documenting it prevents later confusion.
The installer should also confirm the delay is stable over repeated cycles. A timer that drifts, that triggers early, or that sometimes fails to open the circuit entirely is a fault, not a tolerance, and the installer should replace or repair the unit rather than accept it. A hotel key card switch installation guide treats a reliable, repeatable timer as a quality bar, because an energy-saving switch that randomly leaves the room powered undermines the entire purpose of the installation.
The delay verification concludes by re-inserting a card during the countdown and confirming the relay stays latched on a repeated cycle. This unit-of-behavior check confirms the switch reads a reinserted card as a continuation, not a new event. A hotel key card switch installation guide closes this step by confirming the final delay value is set to the property's requirement, is recorded on the as-built sheet, and is consistent across all the rooms installed in the same campaign.
Hotel Key Card Switch Installation Guide: Commissioning the Room and Completing the Handover
Commissioning is the final phase of a hotel key card switch installation guide, where the room's real load is reconnected and the installation is confirmed working under genuine conditions. The installer re-energizes the room's real circuits, connects the actual lights, sockets, and air-conditioning to the switched feed, and runs the card-insert test once more with the real load rather than the dummy lamp. A hotel key card switch installation guide has the installer confirm the relay carries the real room load without overheating or buzzing, and that every circuit the switch controls actually powers up.
The second commissioning check is a full functional pass of every switched feature. The installer confirms each light, each socket, and the air-conditioning respond correctly to the card: all live with the card inserted, all cut together after the delay on card removal. A hotel key card switch installation guide has the installer involve a second pair of eyes or a checklist so no circuit is missed, because a retrofit that leaves one socket permanently unswitched or one light uncontrolled is a defect that surfaces only when a guest complains.
The third check is tidiness and safety at the box. The installer confirms all conductors are secured, terminals tight, unused entries sealed, and the panel and any external relay fixed firmly. A hotel key card switch installation guide treats the finished box as a deliverable: neat, no bare cable, no crowding, and a panel that sits flush and level. This final inspection catches loose work that could pass a functional test but cause a fault or a nuisance later.
The fourth check is restoring the room to service and handing it over. The installer ensures the room is left with the card switch in its normal card-controlled state, the front desk is advised that the unit is live, and the room is clean and correctly finished before it is released. A hotel key card switch installation guide notes that housekeeping staff should be told the basic behavior — insert the card to power, remove it to cut after the delay — so they do not mistake the intentional delay-off for a fault, and so they use the override correctly if one is fitted.
Finally, the installer records the completed installation. The as-built record should note the room number, the model, the card medium, the delay set, the override behavior, and any settings deviating from the default. A hotel key card switch installation guide advises keeping these records per room for the whole property, because they make later service, spares ordering, and troubleshooting dramatically faster. A complete, accurate record turns a retrofit from a one-off installation into a manageable part of the property's ongoing electrical maintenance.
Hotel Key Card Switch Installation Guide: Retrofitting Without Downtime
A hotel key card switch installation guide is most valuable to a working hotel when the owner can retrofit without taking rooms out of service for long. The practical approach is to batch the work by floor and schedule each room during its natural vacancy, not to shut down an entire wing at once. Each room typically needs less than an hour of active work once the electrician is practiced, so a two-person team can move through a floor efficiently while the sales office marries the work to occupancy. The guide has the installer confirm the room arrangement before starting, remove only the face plate and switch being replaced, and keep the guest room furniture and finishes protected during the swap. For phased projects, the owner standardizes on one card medium and one delay setting across every wing so the behavior is uniform for guests and for housekeeping. A hotel key card switch installation guide that plans for phasing, protects finishes, and standardizes configuration turns a large retrofit into a sequence of short, predictable room visits rather than a disruptive project, which is why phased delivery is now the default for occupied properties.
Part of this article content is generated by AI and optimized for professional accuracy and readability.
blog.inArticleCta.title
blog.inArticleCta.description
contentGraph.title
contentGraph.description
contentGraph.sections.products
3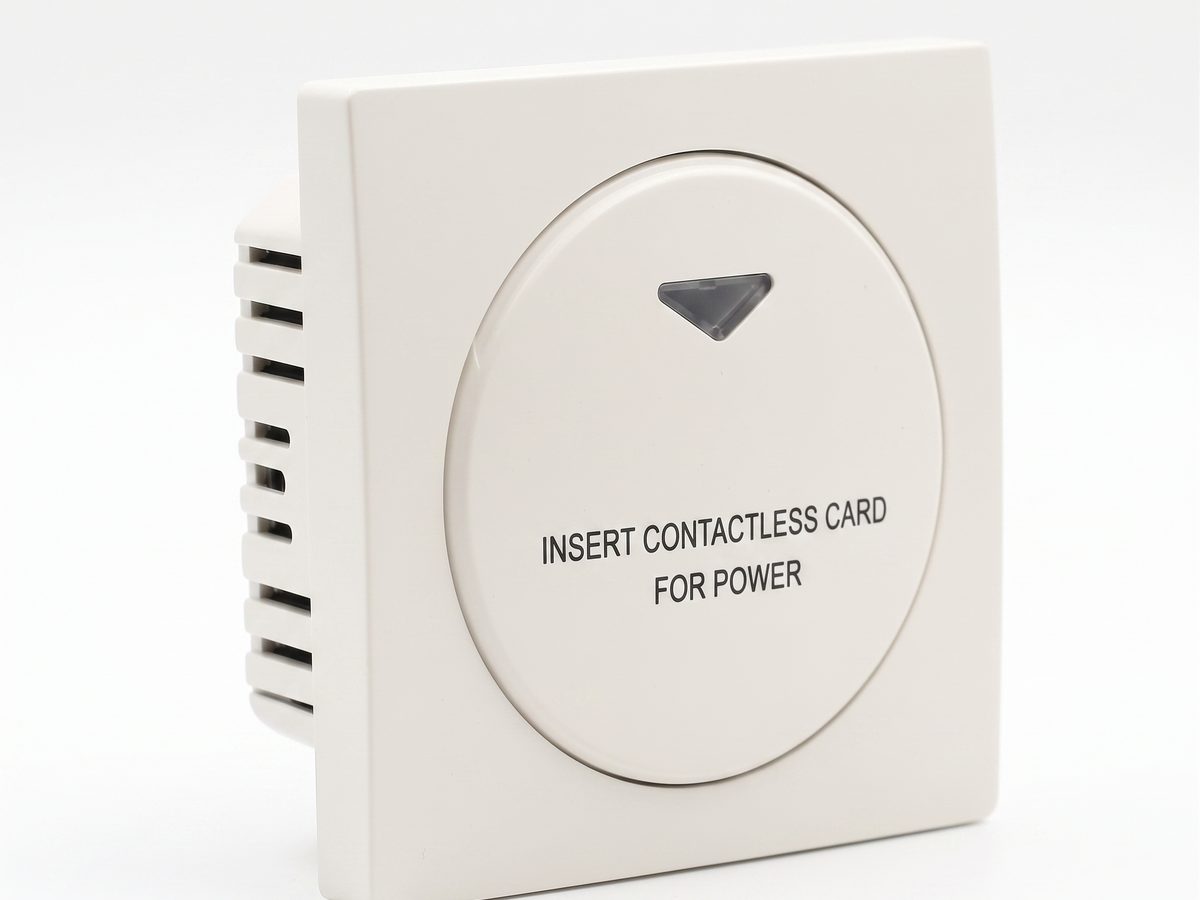
Hotel Key Card Switch — Kontrol Daya Kamar Tamu
Hotel key card switch untuk kontrol daya kamar tamu. Deteksi kartu RFID/IC, masukkan kartu untuk menyalakan daya, penundaan pemadaman saat kartu dilepas. 220V AC, 10A-16A, RS485 atau dry contact. CE RoHS. Pemasok OEM/ODM.
contentGraph.reasons.explicit
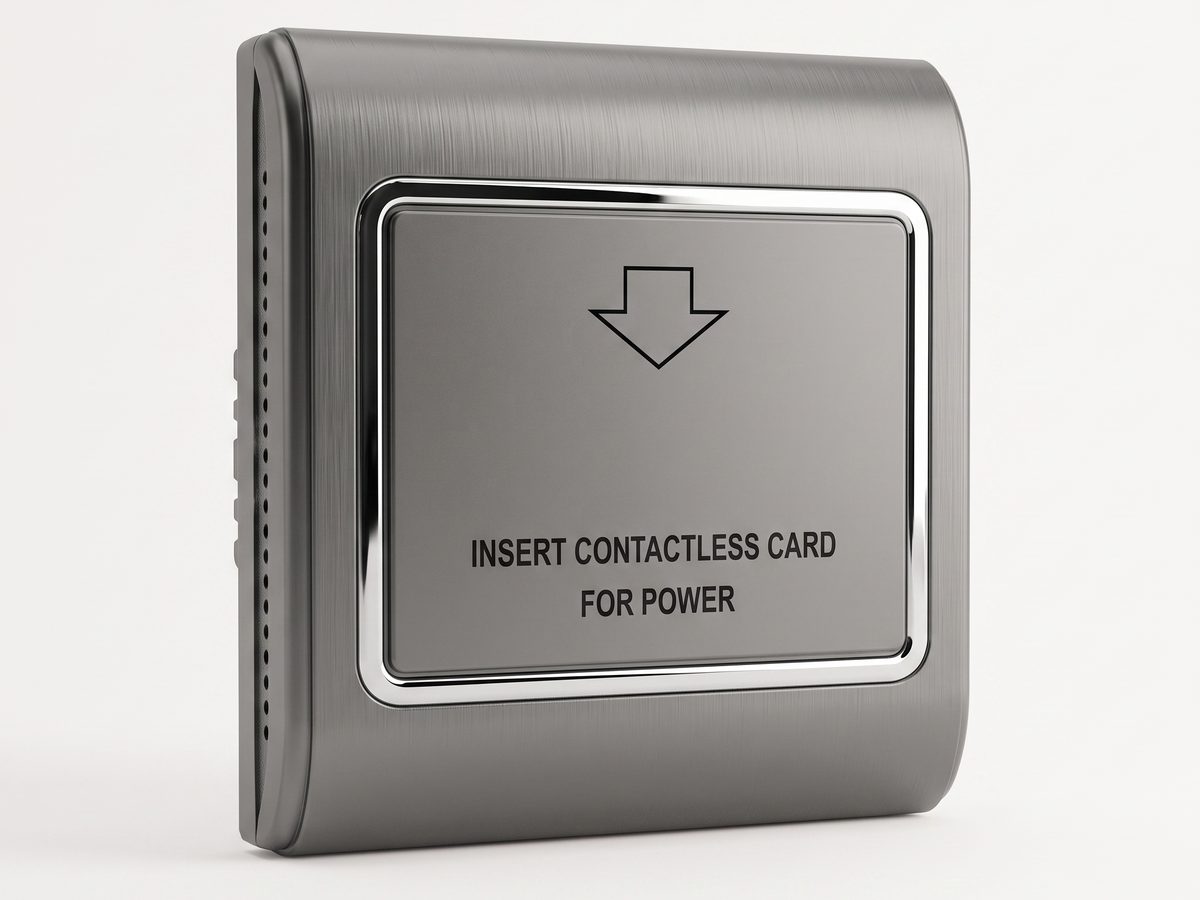
Sakelar Hemat Energi RFID — Kartu MIFARE Ruangan (Tipe B)
Sakelar hemat energi RFID yang mengikat daya ke kartu MIFARE ruangan tertentu. 13.56MHz MIFARE / 125kHz Temic, AC 180–250V, 30A, tunda mati 15 detik.
contentGraph.reasons.explicit
Saklar Energi TTLOCK — Terikat Kamar + Batas Waktu (Tipe C)
Saklar energi kompatibel TTLOCK dengan ID kamar dan batas waktu. Membaca kartu MIFARE TTLOCK / TTHotel via autentikasi sector-key, AC 180–250V, 30A.
contentGraph.reasons.explicit
contentGraph.sections.solutions
3 Panduan Pembelian Saklar Hemat Energi Hotel 2026
Panduan membeli saklar hemat energi hotel: kartu universal, RFID/MIFARE, kompatibel TTLOCK, pintar BLE, dan sensor okupansi. Pilih yang tepat untuk kamar Anda.
contentGraph.reasons.explicit
Sistem Manajemen Energi Hotel — Kontrol Daya Kamar Efisien
Sistem manajemen energi hotel berbasis sakelar kartu, penghemat energi RFID, dan sensor okupansi yang memangkas 25–40% listrik kamar tamu hotel.
contentGraph.reasons.explicit
Sistem Manajemen Kamar Hotel Berbasis Kartu Listrik
Sistem manajemen kamar hotel praktis untuk mengatur daya listrik kamar melalui saklar kartu kunci, kontaktor, dan aturan operasional yang terdokumentasi.
contentGraph.reasons.productContext
contentGraph.sections.blog
3
Hotel Key Card Switch: Jenis, Model, dan Cara Memilih
Panduan hotel key card switch mencakup model universal, RFID, TTLOCK, BLE, dan occupancy, serta cara memilih model yang sesuai dengan sistem kartu hotel Anda.
contentGraph.reasons.productContext

RFID vs NFC untuk Saklar Kartu Kunci Hotel: Pilih Mana?
RFID vs NFC pada saklar kartu kunci hotel berujung pada jangkauan dan penguncian: RFID 125kHz / 13.56MHz (MIFARE, Temic) adalah standar daya kamar hotel…
contentGraph.reasons.productContext
Apa Itu Hotel Key Card Switch dan Cara Hemat Energi Kamar
Hotel key card switch adalah perangkat dinding yang menyalakan listrik kamar saat kartu dimasukkan dan memutusnya saat kartu ditarik, hemat 25–40%…
contentGraph.reasons.productContext
nextStep.blog.title
nextStep.blog.description
- nextStep.blog.points.one
- nextStep.blog.points.two
- nextStep.blog.points.three